How to create a new ResearchKit “Active Task”
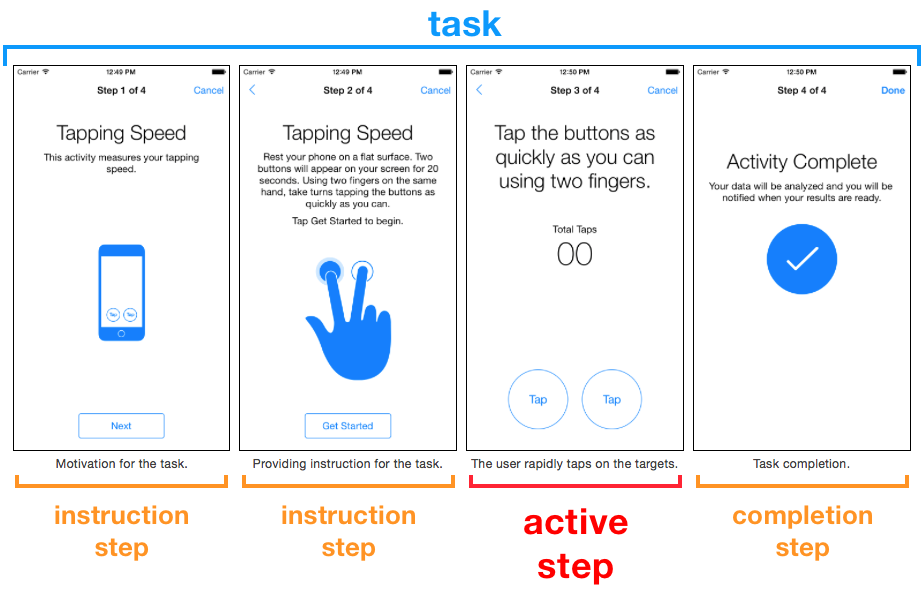
ResearchKit is a framework to create medical research apps, structured by “tasks”, each one divided into a series of “steps”.
A task can be a simple Q&A survey, for instance. But ResearchKit also includes “active tasks”, for richer — more interactive — data collection. They’re usually based on the device sensors: recording audio, tracking movements, testing visual memory, and so on.
![]()
Source: http://researchkit.github.io
Apple made the source code for ResearchKit available on GitHub (a web platform to share code and foster collaboration). They invited everyone to download this code to build new applications, but they also encouraged us to contribute to the code itself, and even submit new kinds of “tasks”.
This is exactly what this post is about: how to create new ResearchKit tasks?
ℹ️ Prerequisites: ResearchKit is coded in Objective-C, and based on the UIKit framework. You should be familiar with iPhone development before considering working on ResearchKit. It’s best to also be familiar with Git and the GitHub workflow, especially if you want to share your work with Apple and the developers community.
Typically, you want to create at least one new kind of active step (the new activity you want to cover), then create a comprehensive task presenting this step, surrounded by the usual instruction and completion steps.

I won’t delve too much into the details here because the framework is fairly complex, and the implementation itself really depends on the type of active step you want to build. Still, I think these guidelines can save you a lot of time, and help you navigate the existing source code to find the relevant bits.
Fork ResearchKit
Start by “forking” the ResearchKit repository. From your fork, create a new branch dedicated to the specific task you’re trying to implement. That’s where you should put all your code (with sensible commit messages). Eventually, you’ll use it to send a “pull-request” back to Apple.
(It’s quite amazing that Apple chose to share ResearchKit on GitHub. Thank you, Apple engineers!)
Create a new step class
This is the model representing your new step. Subclass ORKActiveStep, and add properties for the parameters of your step (as an example, the default audio test only has one property: the duration of the sound being recorded).
You need to take care of the usual NSSecureCoding and NSCopying methods to manipulate, save, and restore the step. Take a look at the ORKActiveStep header to discover all the parameters available, some of them might be useful depending on what your step is trying to achieve (shouldShowDefaultTimer, shouldContinueOnFinish, etc).
In particular, you have to implement stepViewControllerClass to return the corresponding controller class that you’re about to create in the next step. This method tells the task view controller what to instantiate when your step is about to start.
Create a new view controller class (with its content view class)
As you can expect, the view controller associated with your step is very important.
You need to subclass ORKActiveStepViewController, and it usually comes with another custom class for its main view, subclassed from ORKActiveStepCustomView.
The view instantiates all its subviews, and set them up with Auto Layout. You also need to support accessibility, react to tint color changes… and of course display the data being collected.
The controller uses this custom view, and actually collects the data you’re requesting. You might override the start, suspend, resume, finish, and stepDidFinish methods to track the evolution of the step, based on a fixed timer, or on the user events.
Finally, don’t forget to deliver the data, with the result method returning a ORKStepResult object. That leads us to the next step: having a custom result class.
Create a new result class
You can look at the ORKResult class header to find all the existing types of result (numeric value, samples collection, etc). If you need your own type, go ahead and add a new ORKResult subclass there. Add the properties you need, and don’t forget to implement the usual NSCopying and NSSecureCoding methods.
As a side note, I find it a bit confusing that Apple chose to give dedicated files to step classes (e.g. ORKTappingIntervalStep), but kept all the result classes (e.g. ORKTappingIntervalResult) in one file. The main reason is probably that results are part of the public headers, while custom steps aren’t, and we want to limit the number of public headers. So it makes sense, but it’s still confusing when you want to browse the classes for a given task.
Add a new factory method
Like I said in the introduction, a step is usually presented within a given task, including one or multiple instruction step(s), and one completion step. That’s why it’s very convenient to have a “factory” method creating and configuring the task with all its steps.
In the existing ORKOrderedTask class, add a new method to create the array of steps for your new activity. You should use ORKInstructionStep and ORKCompletionStep instances, easy to configure with their title, text, and image properties. You can also add ORKCountdownStep to display a countdown before the main active step.
Your custom step class shouldn’t be part of the public headers, so this method on ORKOrderedTask really is the entry point for applications that will use your new task.
Add artwork images and localized strings
If your controller displays custom images, put the artwork files in /Artwork.xcassets/Active (with @2x and @3x resolutions; you don’t need @1x as ResearchKit is iPhone and iOS 8 only).
If your controller displays text, localize the strings in /Localized. There’s already a folder for every region, at least take care of the en.lproj/Localizable.strings for text in English.
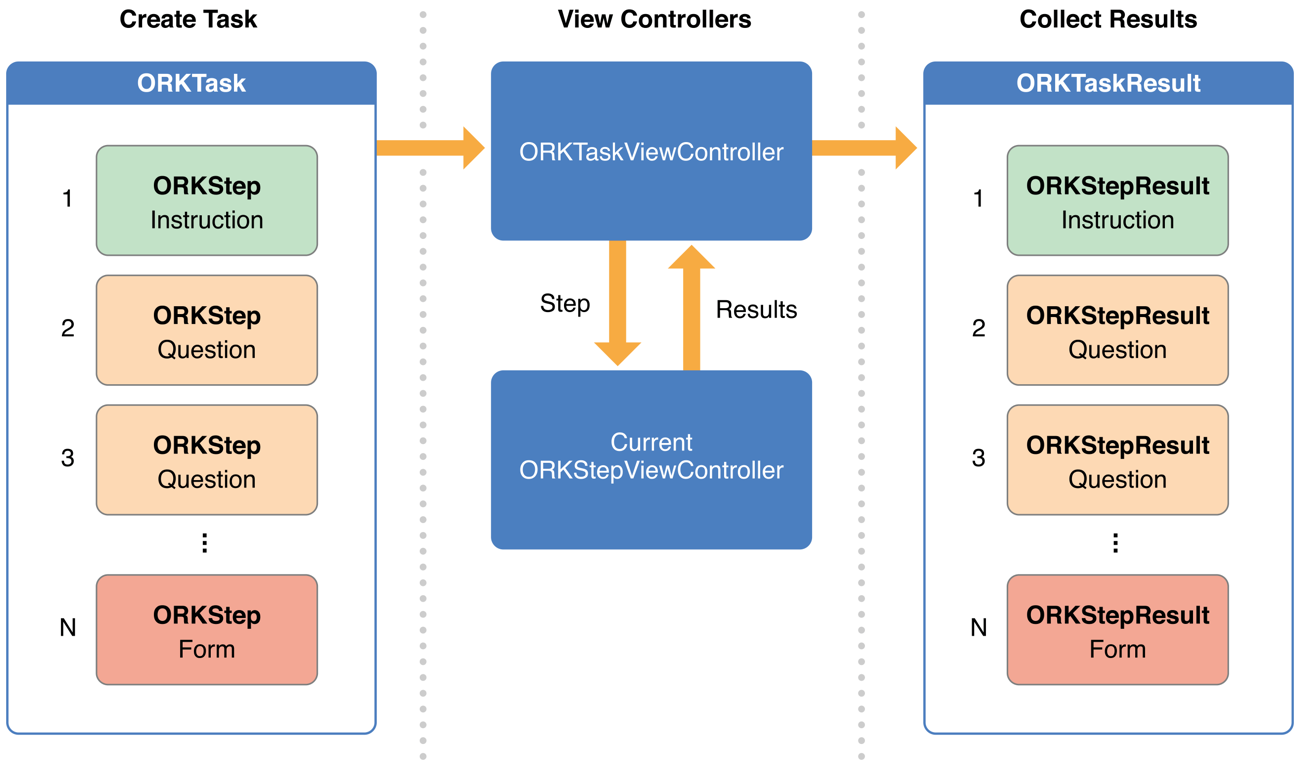
Now, let’s take a step back, and see how this whole thing is supposed to work:

Source: http://researchkit.github.io
Update “Catalog” and “Testing” apps
At this point, your custom active task is ready, but there’s still one more thing to take care of. ResearchKit contains a demo application called “ORKCatalog” (located in /samples) and a testing app called “ORKTest” (in /Testing), to showcase the various types of tasks and steps.
So you should update these projects to include your new task. This will make it a lot easier for Apple to review how your code works, and for scientists to evaluate the usefulness of the module.
Simply follow the example set by the other built-in active tasks, and add your task to the mix. As a bonus, the “Catalog” app is written in Swift, so you get to practice this new langage (don’t worry, you don’t need to be a Swift expert just to add your task).
Send a pull-request
After pushing your code to your forked repo, your task is now available to everyone. But it’s even better to send your source code back to Apple, in order to let them integrate it to the main ResearchKit repo.
Create a pull-request on GitHub, and explain what you’re trying to accomplish with this new task. You’ll probably get some feedback, and you might need to update your code accordingly, but hopefully at one point your work will finally be merged into ResearchKit. Congratulations, you’re part of the future of medical research.


 Share on Facebook
 Share on Twitter