How to Manage Participant Consent with ResearchKit
Obtaining the participants’ consent is a very important process for medical study apps. It is one of the first actions performed by the participant, and it enables legal compliance for all the data managed by the app.
As you can expect, ResearchKit offers a comprehensive suite of APIs to manage this process, as part of the more general onboarding sequence.
This article will describe the different classes available to configure, present, and analyse the consent of the participant.
Onboarding
Before presenting the controller for the consent, ResearchKit apps generally display a “onboarding” controller. It gives a general introduction about the study, when the participant opens the app for the first time. This controller will then manage the consent process itself.
So we start by creating a OnboardingViewController. It can be a simple UIViewController subclass, for instance configured with a Storyboard. The typical ResearchKit apps use a UIPageViewController, to divide the introduction into multiple panels, but the content of this controller is really up to you. Just make sure to give a clear and engaging presentation of your study.
What we really need is a “Join Study” button. The associated action presents the “Join” controller, which includes the consent-related components.
  1
2
3
4
5
6
7
8
9

  import UIKit
import ResearchKit

class OnboardingViewController: UIViewController {

  @IBAction func joinButtonTapped(sender: UIButton) {
    // ...
  }
}
Configuring the “Join” task
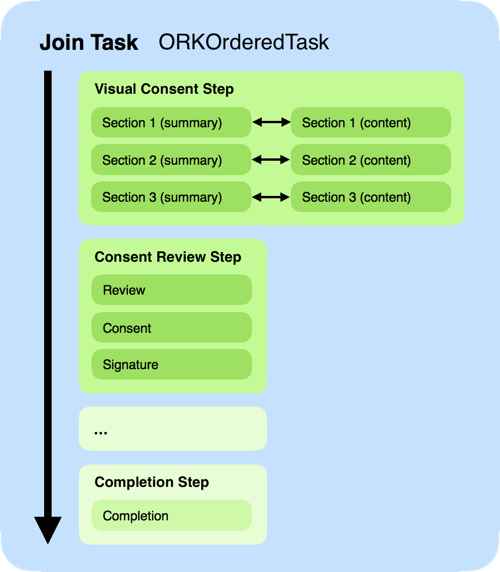
The controller for the consent is actually another “task” controller (ORKTaskViewController, documentation), configured with a series of steps. In particular, it should contain a “visual consent” step, followed by a “consent review” step, both based on a “consent document” describing what is expected from the participant. This task usually includes other steps, addressing various onboarding aspects.
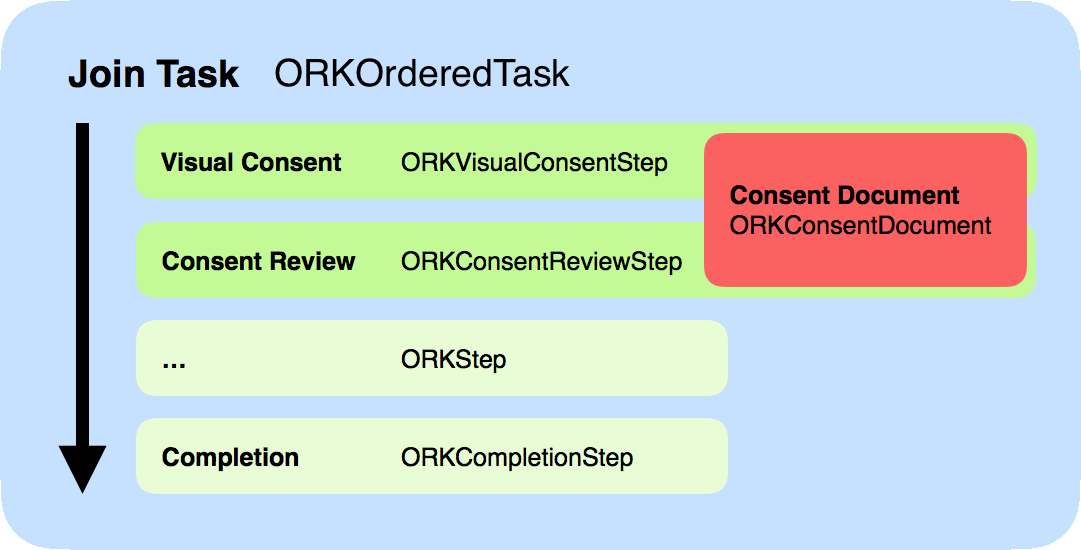
Consent document
The consent document (ORKConsentDocument, documentation) is the main class describing what we expect from the participant. It mostly contains an array of sections, defined as ORKConsentSection (documentation).
You initialize a section with a predefined type. Each type comes with a default title, image, and animation. Then you just need to set a summary and a content. For our example, we build a simple document with 3 sections (Overview, Data Gathering, and Privacy).
  1
2
3
4
5
6
7
8
9
10
11
12
13
14
15
16

  let consentDocument = ORKConsentDocument()
consentDocument.title = NSLocalizedString("Study Consent Form", comment: "")

let section1 = ORKConsentSection(type: .Overview)
section1.summary = NSLocalizedString("Section 1 Summary", comment: "")
section1.content = NSLocalizedString("Section 1 Content…", comment: "")

let section2 = ORKConsentSection(type: .DataGathering)
section2.summary = NSLocalizedString("Section 2 Summary", comment: "")
section2.content = NSLocalizedString("Section 2 Content…", comment: "")

let section3 = ORKConsentSection(type: .Privacy)
section3.summary = NSLocalizedString("Section 3 Summary", comment: "")
section3.content = NSLocalizedString("Section 3 Content…", comment: "")

consentDocument.sections = [section1, section2, section3]
And here’s the list of all available section types (notice the “custom” type, with no predefined title or image):
ORKConsentSectionType.OverviewORKConsentSectionType.DataGatheringORKConsentSectionType.PrivacyORKConsentSectionType.DataUseORKConsentSectionType.TimeCommitmentORKConsentSectionType.StudySurveyORKConsentSectionType.StudyTasksORKConsentSectionType.WithdrawingORKConsentSectionType.CustomORKConsentSectionType.OnlyInDocument
Visual consent
The “visual consent” step will display one screen for each section of the consent document. There’s the animated image, the title, the summary, and a button to show the section content modally.
Using our 3-section document, it’s very simple to create the visual consent step (ORKVisualConsentStep, documentation).
  1
2
3

  let consentStep = ORKVisualConsentStep(
  identifier: "VisualConsentStep",
  document: consentDocument)
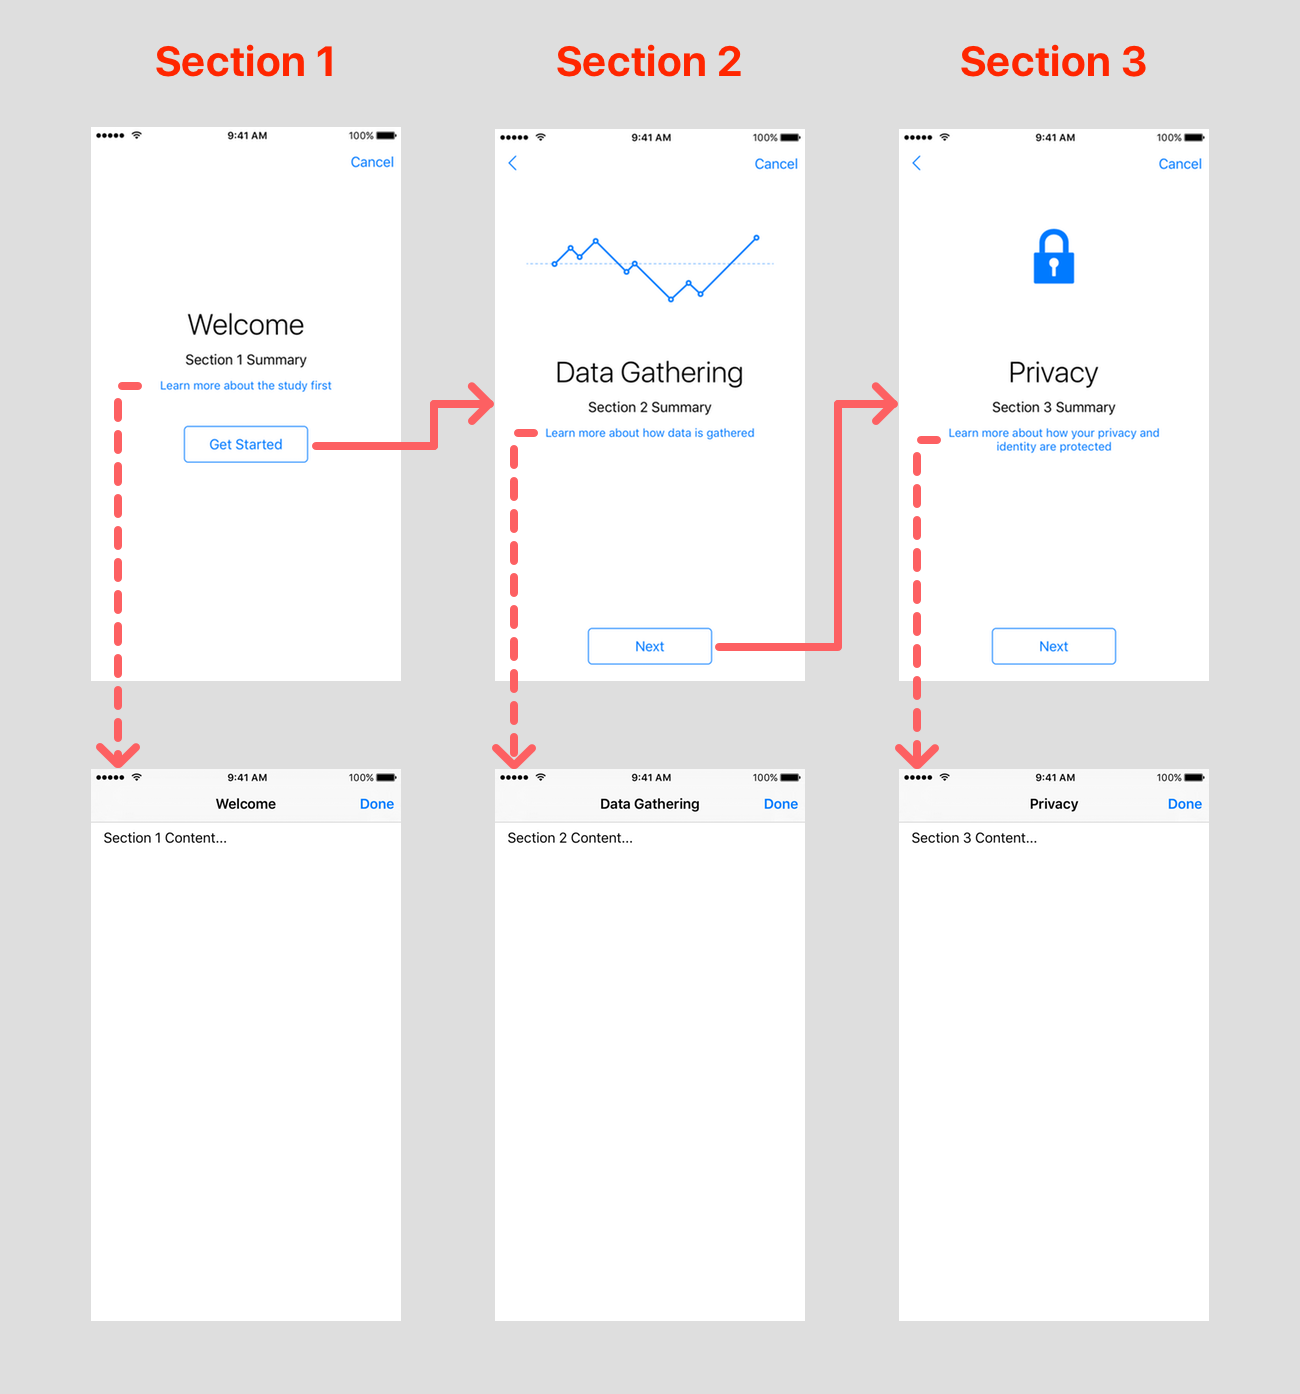
As you can see, ResearchKit can configure all the assets, and take care of the navigation. We only need to provide the summary (short text) and content (comprehensive text) for each section.
Consent review
The next step is the “consent review” (ORKConsentReviewStep, documentation). It’s composed of multiple screens too, starting with the recapitulation of all the consent document sections (“Review”). The participant can then enter his or her name (“Consent”), and finally sign the resulting document on the device screen (“Signature”).
The expected signature (ORKConsentSignature, documentation) first has to be defined with a unique identifier, and attached to the consent document. For more complex studies, you could add multiple signatures, for instance for the practitioner or other people involved. The review consent step can then be created from this document, and for one particular signature.
  1
2
3
4
5
6
7
8
9
10
11
12

  let signature = ORKConsentSignature(
  forPersonWithTitle: nil,
  dateFormatString: nil,
  identifier: "ConsentDocumentParticipantSignature")
consentDocument.addSignature(signature)

// ...

let reviewConsentStep = ORKConsentReviewStep(
  identifier: "ConsentReviewStep",
  signature: signature,
  inDocument: consentDocument)

Extra steps
There’s already a lot of information contained in these two steps, but most ResearchKit apps also include additional joining steps.
For instance, you can request permissions for protected data (Health, location, etc). You also generally have a step to setup a passcode, to protect the participant data every time someone opens the app. And finally, there’s usually a completion step to congratulate the person who just joined the study.
For our example, we’ll just add a generic completion step.
  1
2
3

  let completionStep = ORKCompletionStep(identifier: "CompletionStep")
completionStep.title = NSLocalizedString("Welcome aboard.", comment: "")
completionStep.text = NSLocalizedString("Thank you for joining this study.", comment: "")
Presenting the “Join” task
Once we have all of our steps configured, ResearchKit makes it very easy to create and display them, just like any other “task”, with the generic ORKTaskViewController (documentation).
  1
2
3
4
5
6
7

  let orderedTask = ORKOrderedTask(
  identifier: "Join",
  steps: [consentStep, reviewConsentStep, completionStep])
let taskViewController = ORKTaskViewController(task: orderedTask, taskRunUUID: nil)
taskViewController.delegate = self

presentViewController(taskViewController, animated: true, completion: nil)
With our example, these 3 steps actually generate 10 screens (or controllers), with the possibility of adding extra steps before completion. Here’s the complete walkthrough, based on the code written so far:
Obtaining results
Now it’s time to extract the consent results. We’ve set the onboarding view controller as the task controller delegate, which means that it will be responsible for analyzing the task results.
  1
2
3
4
5
6
7
8
9
10
11
12
13
14

  func taskViewController(
  taskViewController: ORKTaskViewController,
  didFinishWithReason reason: ORKTaskViewControllerFinishReason,
  error: NSError?) {
    switch reason {
      case .Completed:
        // Save onboarding result
        // Dismiss task and onboarding controller

      case .Discarded, .Failed, .Saved:
        // Only dismiss task controller
        // (back to onboarding controller)
    }
}
The task will be considered as “completed” once the participant has navigated through all the steps. You should then record this event, to ignore the onboarding process for subsequent uses of the app. And you need to dismiss the “join” task controller, as well as the onboarding controller itself, to navigate back to the main study controller.
On the other hand, if the participant cancelled or interrupted the “join” task, you should keep the onboarding controller visible, and let the user restart the task. One should not be able to join a study without successfully completing the consent process.
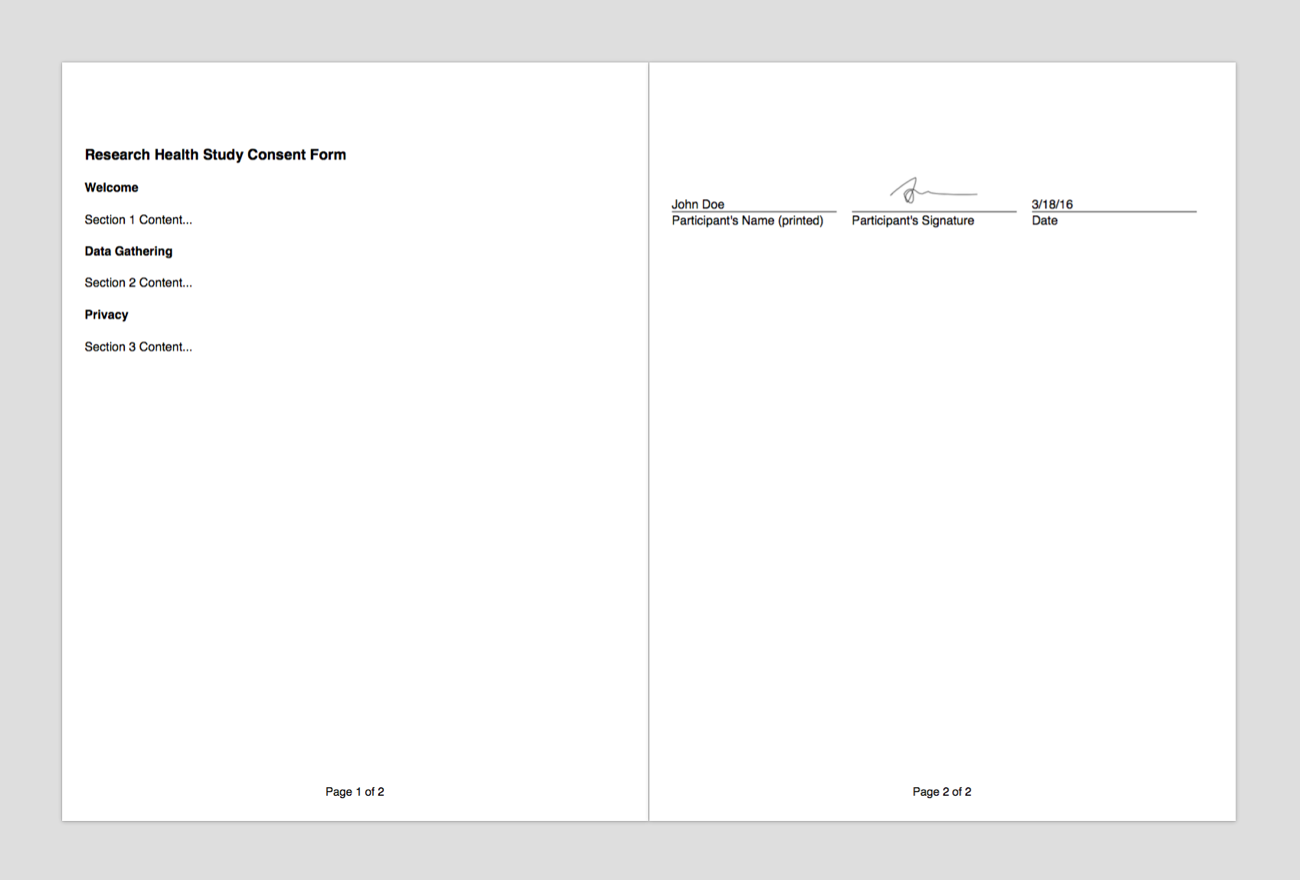
Generating consent PDF
Studies often require to materialize the participant consent in the form of a PDF document. ResearchKit provides a method to generate this file, based on the consent document we already configured, and the actual signature obtained from the consent review step.
In the task controller delegate taskViewController:didFinishWithReason:error: method, if the task is considered as completed, we first need to retrieve the consent review step result, based on the step identifier. This specific result object is a ORKConsentSignatureResult (documentation). To generate the PDF, we need to apply that signature result onto the consent document that we used to configure this task, with the applyToDocument() method. It doesn’t have to be the same instance of ORKConsentDocument, but it must have the same content.
So now that we’ve applied the participant’s signature, this document can generate a consent PDF, using makePDFWithCompletionHandler(). Notice that this method is asynchronous, so you need to handle the generated data in the background.
In the following example, we simply save the PDF file to the “tmp” temporary folder.
  1
2
3
4
5
6
7
8
9
10
11
12

  let result = taskViewController.result
if let stepResult = result.stepResultForStepIdentifier("ConsentReviewStep"),
  let signatureResult = stepResult.results?.first as? ORKConsentSignatureResult {
    signatureResult.applyToDocument(consentDocument)

    consentDocument.makePDFWithCompletionHandler { (data, error) -> Void in
      let tempPath = NSTemporaryDirectory() as NSString
      let path = tempPath.stringByAppendingPathComponent("signature.pdf")
      data?.writeToFile(path, atomically: true)
      // print(path)
    }
}
This file contains all the consent document sections, with title and content. On the last page, we find the participant’s name (as entered in the consent review second screen), the participant’s signature (from the consent review third screen), and the date.
Sample code: the complete source code for this onboarding view controller is available on GitHub.
See also: ResearchKit Programming Guide — Informed Consent
Conclusion
Like with traditional studies, obtaining the participant’s consent for a ResearchKit app is a well-established process. It takes a fair amount of preparation, but the result should confidently address the related legal constraints.
It’s also one of the first interactions being performed by the user, which makes it all the more important. Obtaining the participant’s consent should build the initial trust needed to start the study.
 Share on Facebook
 Share on Twitter